Dreaming of a vibrant slice of the ocean in your home? Perhaps you’ve been captivated by the playful antics of a certain famous animated fish and wondered if you could bring that magic to life. Good news: setting up a clownfish aquarium is not only possible for beginners, it’s one of the most rewarding journeys you can embark on in the world of saltwater aquatics.
Clownfish aren't just charismatic; they're incredibly hardy, full of personality, and, thanks to widespread captive breeding, a sustainable choice for your first marine tank. Forget the myths of impossible saltwater setups – with the right knowledge and a dash of patience, you can create a thriving, beautiful home for these iconic orange-and-white marvels. This guide will walk you through every step, ensuring your success.
At a Glance: Your Clownfish Aquarium Roadmap
- Tank Size: Start with at least a 20-gallon tank for a pair, preferably an All-In-One (AIO) model.
- Water: Use RODI water mixed with quality reef salt to a specific gravity of 1.025-1.026.
- Filtration: Live rock is your primary biological filter; AIO tanks offer mechanical and chemical.
- The Nitrogen Cycle: This is critical. Allow 4-8 weeks for your tank to fully cycle before adding fish.
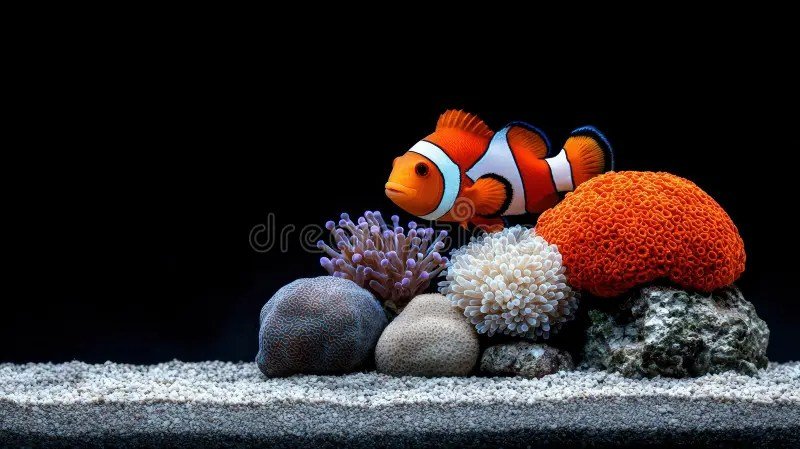
- Anemones: A big NO for new tanks. Clownfish will host other items.
- Maintenance: Weekly 10-15% water changes and parameter testing are key.
- Patience: The most important ingredient for saltwater success. Don't rush!
Why Clownfish? Your Perfect Saltwater Starter Fish
Of the many dazzling species swimming in the world's oceans, the clownfish stands out as an exceptional choice for the aspiring marine aquarist. Most commonly, we're talking about the Ocellaris Clownfish (Amphiprion ocellaris), the real-life counterpart to the beloved "Nemo" fish.
Here’s why they’re the ideal entry point into saltwater keeping:
- Hardiness: They tolerate minor fluctuations in water parameters better than many other marine species, forgiving small beginner mistakes.
- Personality: Each clownfish has a distinct character, from shy to boisterous, often displaying amusing behaviors as they interact with their tank or even your reflection.
- Manageable Size: Reaching only 3-4 inches, a pair of Ocellaris clownfish can thrive in a smaller, more accessible tank size.
- Sustainability: The vast majority of clownfish sold today are captive-bred, meaning you're supporting ethical practices and not impacting wild populations.
- Social Dynamics: Clownfish live in fascinating social hierarchies, with all individuals starting as males and the dominant fish eventually becoming female. Watching their pair bonding and territorial displays is truly captivating.
These little inhabitants of the Eastern Indian Ocean and Western Pacific, typically found in shallow reefs and lagoons, are ready to bring their vibrant charm to your home. Ready to learn more about these fascinating creatures? Explore the world of Nemo fish and dive deeper into their natural history and behaviors.
Laying the Foundation: Essential Gear for Your Clownfish Home
Before you even think about adding water, setting up a successful clownfish aquarium begins with gathering the right equipment. Think of this as building the very ecosystem your fish will depend on, so quality and suitability are paramount.
The Right Tank Size Matters
For a single Ocellaris clownfish, a 10-gallon tank might seem sufficient, but for a pair – and you’ll definitely want a pair to witness their social dynamics – a 20-gallon tank is the perfect minimum. Why 20 gallons? More water volume means greater stability in water parameters, which is critical for saltwater environments. Fluctuations are buffered, making your life easier and your fish healthier.
Our Recommendation: Consider an All-In-One (AIO) tank. These tanks cleverly integrate filtration components (sump, protein skimmer, media baskets, return pump) into the back compartment, leaving the display area clean and uncluttered. They simplify the setup process significantly for beginners.
Prime Placement for Stability
Where you put your tank is just as important as the tank itself. Choose a stable, level surface that can safely bear the considerable weight of water, substrate, and rock (water alone weighs about 8.3 lbs per gallon!).
- Avoid Direct Sunlight: This can cause extreme temperature swings and encourage rampant algae growth.
- Steer Clear of Drafts: Windows, doors, and vents can lead to temperature instability.
- Accessibility: Ensure you have enough space around the tank for maintenance, cleaning, and feeding.
The Water: More Than Just H2O
This is perhaps the most crucial element. You cannot simply fill your saltwater tank with tap water.
- Reverse Osmosis De-Ionized (RODI) Water: Tap water contains impurities like phosphates, nitrates, silicates, and heavy metals that are detrimental to a reef environment and fuel nuisance algae. An RODI unit purifies water to near-zero total dissolved solids (TDS). You can buy RODI water from local fish stores or invest in a home unit.
- Quality Reef Salt: You'll mix this purified water with a high-quality synthetic marine salt mix formulated for reef aquariums. Look for brands known for consistency and trace element inclusion.
- Salinity: The specific gravity (SG) of your mixed saltwater should be 1.025-1.026. This mimics natural ocean conditions.
- Measurement: You’ll need an accurate tool to measure salinity: a refractometer is highly recommended over a hydrometer for its precision. Calibrate it with RODI water regularly.
Substrate: A Living Bed
Your tank’s bottom layer isn't just aesthetic; it plays a role in the ecosystem.
- Live Sand: A 1-2 inch bed of "live sand" (pre-seeded with beneficial bacteria) is ideal. This type of sand not only looks natural but also provides surface area for beneficial bacteria, further aiding in biological filtration. Rinse it thoroughly before adding to avoid cloudiness.
Live Rock: Your Tank's Biological Powerhouse
This is where the magic happens for biological filtration. Live rock is porous rock that is either collected from the ocean (less common and less sustainable now) or, more preferably, aquacultured or "man-made" dry rock that becomes "live" once seeded with beneficial bacteria in your tank.
- Biological Filtration: The countless pores and crevices in live rock provide an immense surface area for beneficial nitrifying bacteria to colonize. These bacteria convert harmful ammonia and nitrite into less toxic nitrate, making it the primary filter for your saltwater system.
- Quantity: Aim for 1 to 1.5 pounds of live rock per gallon of tank volume.
- Sustainability: Opt for aquacultured or dry "man-made" rock. This protects natural reefs and often comes free of unwanted pests.
Heating Things Up (Just Right)
Clownfish thrive in stable, tropical temperatures.
- Heater: An adjustable submersible heater is essential. As a rule of thumb, use 3-5 watts per gallon (so a 20-gallon tank needs a 60-100 watt heater).
- Temperature: Maintain a consistent temperature between 76-78°F (24-26°C).
- Thermometer: Always use a reliable thermometer to monitor the tank temperature independently of your heater's setting.
Filtration: Beyond the Basics
While live rock is your primary biological filter, other forms of filtration are also important.
- Biological: As discussed, live rock is king.
- Mechanical: AIO tanks often have filter socks or sponges that physically trap particulate matter and debris. These need regular cleaning.
- Chemical: Activated carbon is a common chemical filtration media used to remove dissolved organic compounds, odors, and water discoloration. It should be changed every 2-4 weeks.
- Protein Skimmer (Optional but Recommended): For a 20-gallon AIO, a small protein skimmer can significantly improve water quality by removing organic waste before it breaks down. Many AIO tanks have compartments designed for these.
Water Movement: Keeping It Dynamic
Still water is stagnant water. Proper water movement is vital for oxygen delivery, nutrient transport, and preventing detritus from settling.
- Powerhead or Wavemaker: These devices create currents within the tank, mimicking natural reef environments. Choose one appropriate for your tank size to avoid creating a "blender" effect.
- Benefits: Ensures gas exchange at the water surface, carries food to corals (if you add them later), and keeps detritus suspended for mechanical filtration to catch.
Lighting Up Their World
The type of lighting you need depends on your long-term goals.
- Fish-Only Tank: A simple LED light is perfectly sufficient for viewing your clownfish and won't fuel excessive algae growth.
- Reef-Capable LED: If you envision adding anemones or corals down the line, invest in a higher-quality, full-spectrum reef LED light from the start. Anemones, in particular, have very specific and demanding lighting requirements.
Understanding these essential saltwater aquarium basics is your first step towards building a successful and beautiful marine environment.
Step-by-Step: Bringing Your Clownfish Aquarium to Life
With your equipment gathered, it’s time for the exciting part: setting up your tank! Follow these steps carefully to ensure a healthy start for your clownfish.
1. Prep Work: Clean Slate, Clear Start
Begin by thoroughly cleaning the inside of your new aquarium. Use only freshwater (RODI water is best) and a clean, dedicated cloth or sponge. Never use soaps, detergents, or household cleaners, as residues can be toxic to marine life. Rinse thoroughly.
2. Aquascaping: Building Their Reef Home
This is where you get to be an artist!
- Add Substrate: Carefully pour your rinsed live sand into the tank, spreading it evenly to a depth of 1-2 inches.
- Arrange Live Rock: Start placing your live rock. Crucially, rest the rock directly on the bottom glass of the tank, not on the sand. This prevents the rockwork from collapsing if fish or invertebrates dig under it. Create stable structures with caves, arches, and ledges. This isn't just for aesthetics; it provides hiding spots and territories for your clownfish and future tank mates.
3. Mixing and Adding Saltwater: The Salty Foundation
This step requires precision.
- Mix Separately: In a large, clean bucket or brute trash can dedicated solely to saltwater, combine your RODI water with your chosen reef salt.
- Circulate and Heat: Use a powerhead to circulate the water, ensuring the salt fully dissolves. Add an adjustable heater to the bucket and bring the water to your target temperature (76-78°F). This typically takes 24 hours.
- Test Salinity: Once the salt is fully dissolved and the temperature is stable, use your refractometer to verify the specific gravity is 1.025-1.026. Adjust by adding more salt (if too low) or more RODI water (if too high).
- Carefully Add to Tank: Once perfectly mixed and temperature-matched, carefully pour the saltwater into your aquarium. Placing a plate or a plastic bag on the substrate first can help prevent disturbing the sand bed.
4. Equipment Check: Powering Up
With water in the tank, it's time to install and start your gear.
- Install Heater: Place your submersible heater in a stable location, preferably where there's good water flow, and set it to 76-78°F.
- Position Powerhead/Wavemaker: Install your water movement device to create gentle, random flow throughout the tank.
- Install Filtration: Place filter media (e.g., carbon, filter floss) into your AIO's compartments. Start the return pump and any protein skimmer (if applicable).
- Run for 24 Hours: Let all equipment run for at least 24 hours. This ensures stable temperature and salinity before proceeding. Check your thermometer and refractometer again.
5. The Nitrogen Cycle: Patience, the Ultimate Virtue
This is the absolute most critical, non-negotiable step in setting up any new aquarium, especially saltwater. Your tank is NOT READY FOR FISH until this biological process is complete. Rushing it is the most common reason for failure in new setups.
What is the Nitrogen Cycle?
It's a natural biological process where beneficial bacteria establish in your tank's live rock and substrate, converting toxic waste products into less harmful forms.
- Ammonia (NH3/NH4+): Fish waste, uneaten food, and decaying matter release ammonia, which is highly toxic to fish.
- Nitrite (NO2-): A different type of bacteria (Nitrosomonas) converts ammonia into nitrite, which is also highly toxic.
- Nitrate (NO3-): Finally, a third group of bacteria (Nitrobacter) converts nitrite into nitrate, which is much less toxic and can be managed with water changes.
How to "Cycle" Your Tank:
- Duration: The nitrogen cycle typically takes 4-8 weeks to complete.
- Ammonia Source: You need to introduce an ammonia source to "feed" the beneficial bacteria and get the cycle started.
- "Shrimp Method": Place a small, raw cocktail shrimp (uncooked, unseasoned) into a mesh bag in your tank and let it decay.
- Bottled Ammonia: Add a few drops of pure ammonia (without surfactants or perfumes) daily until you see readings.
- Bacterial Additives: Some bottled products claim to instantly cycle a tank or speed up the process. While they can help, don't rely solely on them; still, monitor parameters.
- Test Kits are Essential: Invest in a reliable liquid test kit (not paper strips) that measures Ammonia, Nitrite, and Nitrate. You will be using these frequently.
- Monitoring the Cycle:
- You'll initially see ammonia levels rise, then fall as nitrite begins to appear.
- Next, nitrite levels will rise, then fall as nitrate starts to build up.
- The cycle is complete when both Ammonia and Nitrite consistently read zero for several days, and Nitrate is present. At this point, your tank has a stable population of nitrifying bacteria.
Understanding understanding the nitrogen cycle is foundational to long-term success in any aquarium. Do not skip this step!
Welcoming Your New Clownfish (and Friends!)
Once your nitrogen cycle is fully complete and your water parameters are stable, the moment you've been waiting for arrives! But don't just dump your new fish in. A proper acclimation process is crucial.
The Gentle Introduction: Acclimation Done Right
Fish are sensitive to changes in water chemistry. Acclimation minimizes stress and prevents shock.
- Temperature Acclimation: Float the sealed bag containing your clownfish in your aquarium for 15-20 minutes. This allows the water temperature in the bag to slowly match your tank's temperature without mixing water.
- Drip Acclimation: This method slowly introduces your tank water into the fish's bag water, gradually adjusting them to your tank's specific gravity and pH.
- Open the bag and roll down the edges to create a floatable ring.
- Using airline tubing, tie a knot in the line to create a slow drip from your main tank into the fish bag (about 2-3 drips per second). You can also use a small dosing pump or simply pour small amounts of tank water into the bag every 5-10 minutes.
- Allow this process to continue for 30-60 minutes, or until the volume of water in the bag has roughly doubled.
- Important: Do NOT let the bag overflow back into your main tank, as this can introduce pathogens or undesirable organisms from the fish store water.
- Transfer: Carefully net your clownfish from the bag and gently release them into your aquarium. Discard the bag water – do not add it to your tank.
- Lights Off: Keep your aquarium lights off for the rest of the day to help reduce stress for your new inhabitants.
Anemones: Wait, Seriously, WAIT!
It’s tempting to imagine your clownfish snuggling into a beautiful anemone right away, just like in the movies. However, do NOT add anemones to a new tank.
- Maturity is Key: Anemones are incredibly sensitive and demanding. They require a mature, stable aquarium environment (at least 6-12 months old) with pristine water quality and powerful, reef-capable lighting.
- Clownfish Are Adaptable: While anemones are their natural hosts, captive-bred clownfish will happily "host" other objects in your tank, such as specific types of soft corals (like euphyllia), powerheads, or even a particular corner of the live rock. Don't risk a tank crash by adding an anemone prematurely.
Choosing Tank Mates: A Peaceful Community
While your 20-gallon tank is perfect for a pair of Ocellaris clownfish, you can often add one or two other small, peaceful fish. The key is to research compatibility and add new fish slowly, weeks apart, to avoid overwhelming your biological filter.
Good options for a 20-gallon tank include:
- Firefish (Dartfish): Colorful, peaceful, and tend to hover gracefully.
- Royal Gramma Basslet: Striking purple and yellow, generally peaceful, and enjoys hiding in rockwork.
- Small Gobies: Such as a Yellow Watchman Goby (often forms symbiotic relationships with pistol shrimp, which can be added later) or various small "nano" gobies.
- Blennies: Like the Tailspot Blenny, known for their unique personalities and algae-eating habits.
Crucial Warnings: - Avoid Overstocking: A 20-gallon tank has limits. Two clownfish and 1-2 other small, peaceful fish is generally the maximum.
- No Mixed Clownfish Species: Do not mix different species of clownfish (e.g., Ocellaris and Percula) in a smaller tank, as they are highly territorial and will likely fight.
- Compatibility Research: Always research the specific needs and temperament of any fish you consider. researching marine fish compatibility is crucial to a peaceful and thriving aquarium.
Maintaining a Thriving Clownfish Ecosystem
Setting up the tank is just the beginning. Consistent, mindful maintenance is what transforms a temporary setup into a flourishing, long-term home for your clownfish.
Feeding Your Finny Friends
Clownfish are omnivores and appreciate a varied diet.
- What to Feed: High-quality marine flakes, small marine pellets, and occasional frozen foods like mysis shrimp or brine shrimp are ideal.
- How Much & How Often: Feed once a day, only what your fish can consume in about 30 seconds. Overfeeding is a common mistake that leads to poor water quality, algae blooms, and unhealthy fish. If you see food hitting the substrate, you're feeding too much.
Your Weekly Wellness Check-up (30 minutes)
Dedicate about 30 minutes each week to this routine to keep your tank pristine and stable.
- Water Change (10-15%): This is your primary method for replenishing trace elements and removing accumulated nitrates and other undesirable compounds.
- Prepare fresh saltwater using RODI water and reef salt, mixed and heated to the tank's exact temperature (1.025-1.026 SG, 76-78°F) at least 24 hours in advance.
- Use a siphon to remove 10-15% of the tank water, simultaneously vacuuming any detritus from the sand bed.
- Slowly add the freshly mixed, temperature-matched saltwater back into the tank.
- Test Water Parameters: Regularly monitor:
- Salinity: Confirm 1.025-1.026 SG.
- pH: Ideally 8.0-8.4.
- Ammonia, Nitrite, Nitrate: Should consistently read zero for Ammonia and Nitrite, with Nitrate levels low (ideally under 10-20 ppm). If nitrates are consistently high, increase water change frequency or volume.
- maintaining optimal water parameters is key to preventing stress and disease.
- Scrape Algae: Use an algae scraper (magnetic, blade, or pad) to clean the inside of your tank glass. This improves aesthetics and light penetration.
- Clean Filter Sponges/Socks: If your AIO uses mechanical filter sponges or socks, remove them and rinse them thoroughly in the old tank water you siphoned out. Never rinse them in tap water, as the chlorine will kill beneficial bacteria. Replace filter floss as needed.
Lighting Schedule: The Goldilocks Zone
- Duration: Aim for an 8-hour photoperiod per day. Using an automatic timer is highly recommended for consistency.
- Why 8 Hours? This provides sufficient light for viewing and potential corals (if added later) without encouraging excessive pest algae growth.
Troubleshooting & Avoiding Common Pitfalls
Even with the best intentions, challenges can arise. Knowing the most common problems helps you avoid them or address them quickly.
Rushing the Cycle: The Beginner's Biggest Blunder
As mentioned, this is the most frequent mistake. Adding fish before your tank is fully cycled inevitably leads to ammonia and nitrite spikes, stressing or even killing your fish. Patience truly is a virtue in saltwater aquariums. Trust the process and use your test kits.
Overstocking: A Recipe for Disaster
It’s exciting to pick out new fish, but every added inhabitant increases the bioload (waste production) on your tank's filtration system. Exceeding recommended stocking levels for your tank size quickly leads to:
- Poor Water Quality: Ammonia and nitrite spikes, high nitrates.
- Increased Aggression: Fish become stressed and territorial.
- Disease Outbreaks: Stressed fish are more susceptible to illness.
Stick to the recommended guidelines: a pair of clownfish plus 1-2 small, peaceful tank mates for a 20-gallon.
Pest Algae: The Unwanted Guest
While some algae are natural, rapid growth of undesirable "pest" algae (like hair algae or diatoms) is a sign of an imbalance in your system.
- Common Causes:
- Excess Nutrients: Overfeeding, insufficient water changes, decaying organic matter (dead spots in substrate), or tap water impurities (phosphates, nitrates).
- Too Much Light: Lights left on too long or too intensely.
- Best Defense: Regular water changes, feeding sparingly, ensuring good water flow, and avoiding tap water are your primary defenses. If you're struggling with algae, consider effective algae control strategies to restore balance.
Beyond the Basics: Breeding Clownfish
Once your clownfish are comfortable and mature, you might notice them exhibiting breeding behaviors. Clownfish are relatively easy to breed at home. The pair will usually clean a flat surface on a piece of rock, where the female will lay eggs, and the male will then fertilize and guard them until they hatch. Raising the fry is a more advanced endeavor, requiring specific foods and separate rearing tanks, but observing the parental care is a treat in itself.
Your Next Step: Dive In With Confidence
Setting up a clownfish aquarium is a wonderfully fulfilling hobby. It combines science, art, and a deep appreciation for marine life. While it requires dedication and patience, the rewards of watching these intelligent, vibrant fish thrive in a miniature ecosystem you've created are immeasurable.
Armed with this comprehensive guide, you have the knowledge to embark on this journey with confidence. Remember: research, patience, and consistency are your greatest allies. Take your time, enjoy the process, and soon you'll be welcoming your very own pair of clownfish into a beautiful, stable home. The ocean awaits!